2013 was an incredibly busy year for us on the freelance front. Unfortunately, that means we weren't able to spend as much time on Little Green Dog projects as we originally planned. Many comic strips were written but never drawn, Pooper is still in production, and we have Brudders toys that we want to prototype on our Form 1 printer, but we've had so little time for any of this. Sigh!
This isn't to say the cats have been lazing about at Little Green Dog these past months. They've been busy working on a new short film called Scareplane, so keep an eye open for the official announcement. Here's a teaser pic from the film...
After Scareplane is released, Team Little Green Dog will be finishing Pooper (for real) and bringing out a batch of new comics.
So hang in there--we have lots of fun and surprises in store for 2014.
Oh, and today is Alisa's birthday. Happy birthday sweetie!
- G.
December 22, 2013
October 22, 2013
iPi Mocap Studio Update: Three Kinects!
iPi Soft recently added support for three Kinect sensors. iPi's 'triple threat' is experimental at this time but if it works, this new feature should improve motion capture quality by completely eliminating occlusion. According the to the official docs, this new configuration is comparable to using six PS3 Eye camera's. The 'downside' is that the capture space is limited to 2.5 x 2.5 meters (about 8 x 8 feet)--not a problem for us because we're used to shooting in an even smaller space.
Here's the full scoop: Getting Started with Triple Depth Sensor Configuration
Exporting the triple Kinect mocap data is available in the Standard edition only (you can try it out in the Basic edition but export is disabled.) Calibration for triple Kinect is similar to the system used for PSP 3 Eyes, using a Maglite in 'candlestick' mode.
We have a third Kinect here at Little Green Dog but sadly no time right now to try this feature because we're busy wrapping up a new cartoon short (this is a separate film from 'B2'--more on this new project later this week.) Next month we may be picking up a little contract mocap work so we'll be R&D-ing the new triple Kinect configuration soon.
Pretty exciting stuff isn't it? I'll report more about this new feature later as time permits.
Additionally, it appears the developers improved iPi Mocap Studio's spine tracking--glad to see this issue getting attention.
G.
July 18, 2013
Our First 3D Print: Sparklepus!
We finally got cooking with our Form 1 and our first print is a toy prototype of Sparklepus from 'Happy Box'. If you don't remember what Sparklepus looks like, here you go...
This is what Sparklepus looks like in the Form 1's PreForm software.
How's it done? With lasers of course!
Fresh from the oven.
Ready for finishing.
Supports removed. Clippers come in handy for this stage.
Cleaned up and ready for painting.
Detail of the mane and tail. Considering the overhangs, I was surprised that the Form 1 could print this without error. "No problem boss!"
Painted!
Beauty shots!
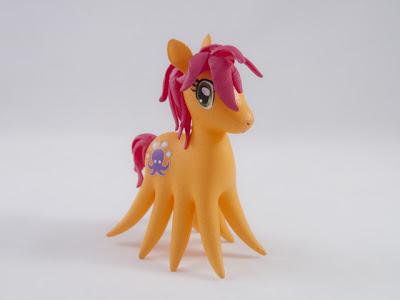
Final observations: The original Sparklepus model was not created with 3D printing in mind--in fact, it was only meant to look good for the 3 shots in 'Happy Box'. The PreForm software evaluated that it would be fine to print it but the mane concerned me and I decided not to risk it.
For this 'print-friendly' version, I modified the hair pieces slightly by adding four more locks and reshaping some of the 'roots' to fully penetrate the 'skin'. The body shape was then used to subtract the intersecting volume from the two hair pieces to make them form fitting for easy assembly. Finally, Sparklepus was separated into three objects: body, mane and tail. This not only made the model more printable but it also made it a lot easier to paint. Other than that, it's the same object Sergeant is holding in the top image.
Once I got the model into PreForm, printing and clean up was mostly hassle free.
My one issue came during the finishing process: with the clear resin material, it was difficult to see how good a job I was doing until after the parts were painted. As it turned out, the mane is a little rougher than I like. I wonder if finishing will become easier once the gray or white materials becomes available. No worries; having done this once now, I feel I can do a better job next time with the clear resin.
Conclusion: considering 'Sparklepus' is my first 3D print, I'm thrilled with the results. The Form 1 is simply a wonderful and amazing addition to our studio!
Technical Notes
Update #2: I just learned I can speed up the printing process by choosing the 100 microns setting. This comes at the cost of fine detail but since this model isn't particularly detailed to begin with, 100 microns might possibly result in a smoother surface too. Really should test this immediately.
By the way, this model was printed at 50 microns (the default setting) and the printer is capable of getting as fine as 25 microns. Microns, schmicrons, so what's does that mean in English? To put it in perspective, the thickness of human hair varies between 50 and 120 microns!
G.
"I don't get it." |
This is what Sparklepus looks like in the Form 1's PreForm software.
How's it done? With lasers of course!
Fresh from the oven.
Ready for finishing.
Supports removed. Clippers come in handy for this stage.
Cleaned up and ready for painting.
Detail of the mane and tail. Considering the overhangs, I was surprised that the Form 1 could print this without error. "No problem boss!"
Painted!
Beauty shots!
Final observations: The original Sparklepus model was not created with 3D printing in mind--in fact, it was only meant to look good for the 3 shots in 'Happy Box'. The PreForm software evaluated that it would be fine to print it but the mane concerned me and I decided not to risk it.
For this 'print-friendly' version, I modified the hair pieces slightly by adding four more locks and reshaping some of the 'roots' to fully penetrate the 'skin'. The body shape was then used to subtract the intersecting volume from the two hair pieces to make them form fitting for easy assembly. Finally, Sparklepus was separated into three objects: body, mane and tail. This not only made the model more printable but it also made it a lot easier to paint. Other than that, it's the same object Sergeant is holding in the top image.
Once I got the model into PreForm, printing and clean up was mostly hassle free.
My one issue came during the finishing process: with the clear resin material, it was difficult to see how good a job I was doing until after the parts were painted. As it turned out, the mane is a little rougher than I like. I wonder if finishing will become easier once the gray or white materials becomes available. No worries; having done this once now, I feel I can do a better job next time with the clear resin.
Conclusion: considering 'Sparklepus' is my first 3D print, I'm thrilled with the results. The Form 1 is simply a wonderful and amazing addition to our studio!
Technical Notes
- Material: Clear Resin
- Amount used: 18.1 ml
- Print Time: 7 hours (This time can be significantly improved. See Update #2 below for new info.)
- Software: LightWave Modeler, 3D Coat, MeshLab, Photoshop (for waterslide decals), and PreForm 0.8.2.
- Paint: Montana Black NC.Formula, Colors: Juice and Punk Pink.
- Decal: Experts-Choice No. 119 for inkjet Printers
- Finishing coat (not applied yet in pics above): Micro Sol Setting Solution (for softening and bonding decals,) Krylon UV-Resistant Clear Matte
Update #2: I just learned I can speed up the printing process by choosing the 100 microns setting. This comes at the cost of fine detail but since this model isn't particularly detailed to begin with, 100 microns might possibly result in a smoother surface too. Really should test this immediately.
By the way, this model was printed at 50 microns (the default setting) and the printer is capable of getting as fine as 25 microns. Microns, schmicrons, so what's does that mean in English? To put it in perspective, the thickness of human hair varies between 50 and 120 microns!
G.
June 30, 2013
One Minute Preview of 'Brudders 2'
Here's a one minute excerpt from our next 'Brudders' short film, currently in production.
The full 3-1/2 minute music video is on track to come out later this year. Watch our blog for further announcements.
You can watch the video here in this blog entry or in magical HD on our Vimeo Channel.
- Sgt M.
The full 3-1/2 minute music video is on track to come out later this year. Watch our blog for further announcements.
You can watch the video here in this blog entry or in magical HD on our Vimeo Channel.
- Sgt M.
Unboxing The Form 1 3D Printer
This week Greenlaw and Sienna recorded an unboxing video for their newly arrived Form 1 stereo lithographic 3D printer.
Little Green Dog helped fund the development of this revolutionary device last year through a Kickstarter campaign. You can watch the video here in this blog entry or in glorious HD on our Vimeo Channel.
- Sgt M.
Little Green Dog helped fund the development of this revolutionary device last year through a Kickstarter campaign. You can watch the video here in this blog entry or in glorious HD on our Vimeo Channel.
- Sgt M.
Labels:
3D Printer,
Form 1,
FormLabs,
MakerBot,
Stereo Lithography
May 10, 2013
A World Without Brudders
Today I'm sending special thanks to John-Mark Austin and Deborah Gates Austin, the founders of the Box at Rhythm & Hues. In the dozen years I worked at the Box, this duo nurtured my creative instincts and pushed my skills beyond what I thought was possible. I'm a stronger artist for having been part of the Box and for that I will always be grateful.
So why the sudden sentiment? John-Mark and Deborah are also responsible for bringing the real Sergeant and Toullie into my life, and it just dawned on me that Brudders would not exist if it wasn't for them.
And without Sergeant and Toullie, I might be drawing a webcomic called Only Sister and it would be very sad and boring.
- G.
John-Mark and Deborah make groovy tunes too. Check out Ray Gun Ballet's latest CD World That Wasn't at www.raygunballet.com.
-Sgt M. and 2e
May 5, 2013
Copa Cabana, Anyone?
This week, Toullie and I break a long dry spell with a comeback tour in Brudders, Episode 61 'I Wite The Songs'.
Work on 'B2' continues as usual. Last week we finished the title animation. That doesn't mean we're anywhere close to being done though.
- Sgt M.
Ahh! It feels great to sit down and just draw again.
- G.
Work on 'B2' continues as usual. Last week we finished the title animation. That doesn't mean we're anywhere close to being done though.
- Sgt M.
Ahh! It feels great to sit down and just draw again.
- G.
April 21, 2013
What, no Toullie?
April 19, 2013
Mocap Helmet Update
The bicycle helmet actually worked out well and looked nice but, as
mentioned previously, it's too expensive for this purpose and I wanted
to continue using it as a bicycle helmet. It was fine for testing,
though. If I had a criticism about it, it's not quite as stable as I'd
like it to be, mainly because of the bulk.
The cheap skateboard helmet was not a good idea--the ratchet in the back broke the first time I tightened it. Good thing I wasn't planning on using it for skateboarding.
So here's what I wound up using: a hardhat made by 3M, purchased from Home Depot for about 9 dollars. Make sure you get the kind with a ratchet suspension. Tip: the white helmet is a few dollars cheaper than the yellow one.
First, I drilled four holes in the top. The holes are spaced to slightly wider than the 1-1/2 inch width of a strip of a Velcro One-Wrap strap we're using to attach the PS Move device. Then I used a utility knife and a metal straight edge to lightly score the edges of the slots I want to cut out. Do this gently and carefully so as not to damage the helmet or, more importantly, cut yourself. Once you have the lines scored, carefully go over the lines over and over again, using only slight pressure, until the knife cuts clean through the helmet. I cannot stress how careful you must be--these knives are very sharp.
Here's the helmet assembled.
Under the PS Move is a small piece of foam rubber. It's long enough to support the base, and short enough not to interfere with the trigger switch. Later tonight, I'm going to glue this pad to the helmet using E-6000 or some kind of contact cement.
You may have noticed that helmet has been painted with gray primer--this is because the original plastic surface is very shiny and reflective. The paint can actually be any color except black and the key is that it needs to have a flat or matte finish. Why? If you're recording with Kinect, shiny reflective surfaces will bounce the IR rays away from the sensors, and you want to avoid black because it may absorb IR rays; if you're recording with PS3 Eye cameras, the reflective surface may confuse the tracking system.
As is, this rig is very stable so long as I'm not jumping up and down. The one thing I'd like to add is a chin strap, which should solve this issue. There are loops on either side of the helmet, so it should be easy to add a strap. In a future entry, I'll post the final version of the helmet with the chin strap. plus some videos of the helmet in action with results.
G.
Update: Added the chin strap and it's all awesome now!
April 17, 2013
Greenlaw's Demo Reel
Last weekend, I finally got around to cutting my reel.
12 years of visual treats condensed to 2 minutes of high protein deliciousness. I don't understand what I just wrote but I'm getting really hungry now.
I thought about creating a shot breakdown but we worked in such a 'round robin' manner in the Box (at Rhythm & Hues,) I'm not sure where to begin. It's easier to say, I did a bunch of stuff and I worked closely with some amazingly talented people.
If you're OCD and you absolutely need to know more about this reel, go here: Greenlaw's Career Profile.
- G.
April 10, 2013
One way to turn a head
Here's a head capture rig I designed and assembled tonight to test the new head tracking system in iPi Mocap Studio.
It came together nicely--the velcro straps fit into the slots in the bicycle helmet and I cut a hole in the foam pad to keep the PS Move's trigger from being pressed--but I'm not sure I can recommend this rig because:
1. To keep the helmet firmly fixed to the head I need to tighten the strap under the neck, which isn't very comfortable for me. I'd much rather have a helmet with an actual chin strap.
2. A bike helmet is too expensive for this purpose and I want to keep using this one as a bike helmet.
This rig will get me started for testing anyway. I'm getting a cheap skateboard helmet in a couple of days but I'm still looking for other options for attaching this thing to my head.
And here are some more sandwiches.
Walrus!
Crabby!
Jelly!
Sienna!
- G.
Labels:
DIY,
hack,
iPi Mocap Studio,
Motion Capture,
PS Move,
Sandwiches
March 28, 2013
Sharks and Recreation
Okay, just so people don't start a rumor that all I do now is make sandwiches, here's a teaser video showing the development for one of the 'Brudders 2' environments: the cemetery.
The completed short film will take place in three different worlds and this cemetery is where it all begins.
Oh, and here's another sammich.
Sharkie!
G.
The completed short film will take place in three different worlds and this cemetery is where it all begins.
Oh, and here's another sammich.
Sharkie!
G.
March 13, 2013
Good Night Rhythm & Hues
I'd like to thank everyone who expressed concern about my job when Rhythm & Hues declared bankruptcy last month. I had an exciting twelve year run with the company, created some beautiful art, and learned a lot from many incredibly talented people there. I'm really going to miss this place which has been more like a school to me than a business, and I will especially miss working with my dear friends.
On the bright side, I now have time to make sandwiches!
Bunny!
Toullie!
Pony!
Doggie!
Another doggie!
Fru fru doggie!
I don't know!
Richard Parker!
Sienna made this one!
Snow leopard!
Really happy doggie!
Moon star doggie!
A satisfied customer.
G.
On the bright side, I now have time to make sandwiches!
Bear!
Bunny!
Toullie!
Pony!
Doggie!
Another doggie!
Fru fru doggie!
I don't know!
Richard Parker!
Sienna made this one!
Snow leopard!
Really happy doggie!
Moon star doggie!
A satisfied customer.
G.
March 7, 2013
March 6, 2013
Guest Artist
This week we have a special guest artist: six-year-old Sienna Kai Greenlaw, a.k.a., 'Sister'.
Sienna wrote and drew the latest episode of Streams and she calls it 'Princess Vs. Dragon'.
- Sgt M.
About this comic: my daughter Sienna overheard me complaining that I didn't have time to draw comics for the website anymore and she decided to help out by writing and drawing this episode of Streams.
I have to admit, it's pretty funny.
- G.
March 1, 2013
Sergeant and Toullie Turntables
Here is the character turntable video for me...
...and for Toullie...
Sister's turntable is coming up next.
- Sgt M.
February 24, 2013
Sergeant Gets Fur Real
Yikes! It's been five months since our last post. Okay then, let's get a few teasers posted this week that show what we've been working on.
Today we have a little peek at how I'm going to look in the new Brudders movie.
We used ZBrush's new FiberMesh tool to groom the fur guides and LightWave 11.5's FiberFX to render the fibers.
- Sgt M.
Today we have a little peek at how I'm going to look in the new Brudders movie.
We used ZBrush's new FiberMesh tool to groom the fur guides and LightWave 11.5's FiberFX to render the fibers.
- Sgt M.
Subscribe to:
Posts (Atom)